How to Change Your MAC Address on Windows 11/10 (The Easiest Way)

Security Status: SAFE
Scanned by 65+ antivirus engines • No threats detected
Screenshots & Preview
Click on images to view full size (1 images)
| Filename: | Neat Windows MAC Changer.zip |
|---|---|
| File Size: | 400KB |
| Version: | 3.0.0 |
| Support: | Windows |
Have you ever needed to change your computer’s MAC address on Windows 11 or 10? Download Neat MAC Changer Tool v3.0.0 or Maybe for privacy on a public Wi-Fi network, to bypass a network restriction at a hotel, or for network testing?
But first, what even is a MAC address? And how do you change it?
Download Neat MAC Changer
Stop digging through complicated Windows settings. Take control of your network privacy and troubleshooting with the easiest, most powerful MAC changer for Windows 10 and 11.
What is a MAC Address?
A MAC (Media Access Control) address is a unique 12-character ID (like 00:1A:2B:3C:4D:5E) assigned to your computer’s network card (both Wi-Fi and Ethernet). Think of it as a permanent, physical serial number for your hardware, while your IP address is like your temporary mailing address on the network.
Why Would You Need to Change It?
- Privacy: On public Wi-Fi (like at an airport or café), networks can log your MAC address to track your device.
- Bypassing Restrictions: Some networks (like hotels or offices) limit access or time based on MAC addresses. Changing it can get you a fresh connection.
- Troubleshooting: Sometimes, new hardware conflicts with an old device on the network.
The Hard Way: How to Change MAC Address Manually
Windows has a built-in method, but it’s hidden, complicated, and doesn’t always work:
- Go to Device Manager.
- Find your Network Adapter (e.g., “Intel(R) Wi-Fi 6…”).
- Right-click, go to Properties -> Advanced tab.
- Find “Network Address” or “Locally Administered Address” in the list.
- Manually type a new 12-character MAC address without any colons or dashes (e.g.,
001A2B3C4D5E). - Restart your adapter and pray it works.
This is confusing, easy to mess up, and often resets itself after a reboot. There has to be an easier way.
The Easy Way: Use Neat MAC Changer (1-Click Solution)
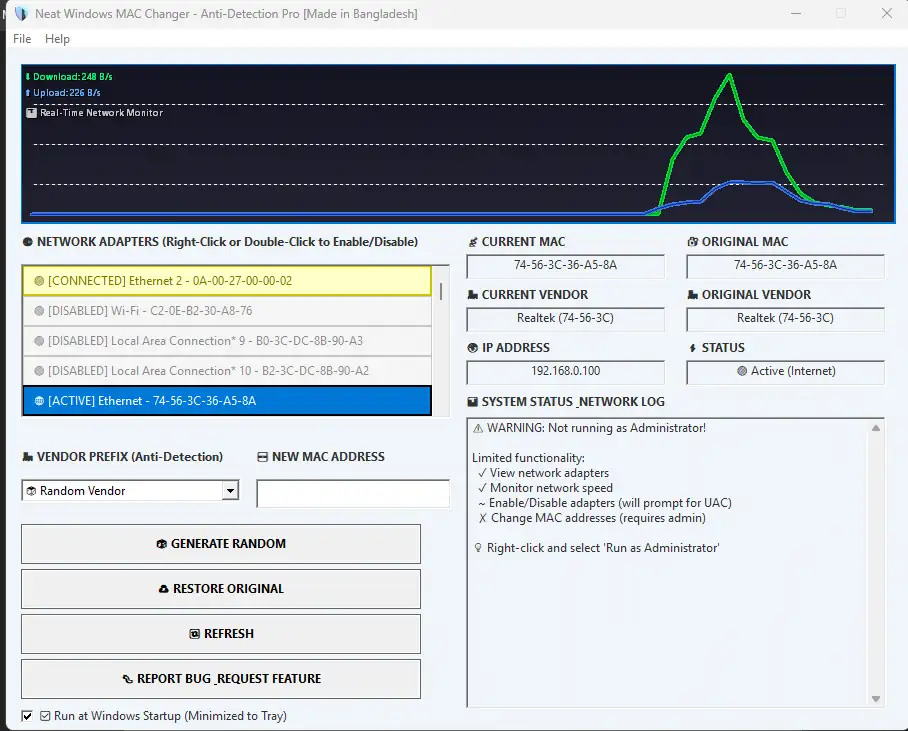
Forget the complicated manual steps. Neat MAC Changer is a powerful tool that does all the hard work for you, giving you full control over your network identity in a simple, professional interface.
Features That Make Your Life Easier:
Instead of just letting you type a random number, Neat MAC Changer gives you professional-grade features:
- One-Click Change: Simply select your adapter, generate a new MAC, and click “Apply”. Done.
- Generate Realistic MACs: Don’t just use a random address. Generate a new MAC from 80+ real vendors (like Apple, Cisco, Intel, Huawei). This avoids detection.
- Always Safe: The tool automatically saves your original, factory MAC address. You can restore it instantly with one click.
- Full Network Control: The tool also lets you quickly enable/disable adapters, see your IP address, and automatically flushes DNS and ARP tables to ensure your new MAC works immediately.
- Smart Interface: See all your adapters in one place, color-coded by status (Active, Offline, Disabled).
Easy Installation
Simple setup process with clear instructions
Safe & Secure
Scanned and verified free from malware
Fast Download
Multiple mirror servers for fastest download speeds
Minimum Requirements
Recommended
- Latest version with all current features
- Bug fixes and performance improvements
- Security updates and patches
- Compatibility improvements
Rate & Review This Software
User Reviews
No reviews yet. Be the first to review!
About the Author / Developer
📱 Related Apps You May Like


Download Mirror Options
Choose your preferred download server:
How to Install
- Click the Download button above
- Wait for download to complete
- Run the installer file (.exe)
- Follow the installation wizard
- Launch the application
How to Extract (ZIP/RAR)
- Download and install WinRAR or 7-Zip
- Multi-part archives: Download all parts (.part1.rar, .part2.rar) into the same folder
- Right-click on any one part (usually .part1.rar)
- Select "Extract Here" or "Extract to folder"
- Tool will auto-extract all parts